
How To Make DIY Glitter Mason Jar Centerpieces
If you have been saving empty mason jars for your wedding, but you’re not quite sure what to do with them, and you also love a bit of glitter, well, we got you! In this post we will show you how to make your very own DIY Glitter Mason Jar Centerpieces in just 4 simple steps. It is such a low cost way to bring a bit of bling to your big day, and you can use any colour comobination you like.
The best thing about this DIY is if you do any kind of crafting already, then you will probably have a lot of the materials needed and it will be an even lower cost for you.

The below content contains affiliate links and we may earn a commission if you shop through them, however this won't cost you anything, it just helps us to keep the site running for free. For more information on affiliate links, see our disclosure here.
WHAT YOU NEED:
• Mason jar(s) (or ask your friends and family to save you some if you haven’t already saved your own!)
• Metallic Spray Paint- golden
• Golden glitter(you can use the colour of your choice)
Step 1
Make sure your jar is clean and free from any dust, marks or glue, take a newspaper or any other extra paper to cover your workspace or tabletop and get all of your items out and ready to use.

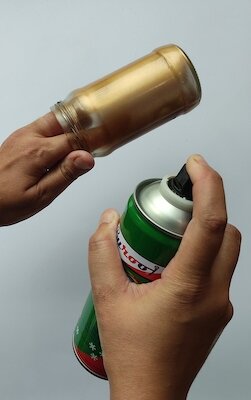
Step 2
Using your metallic spray paint, give your jar a smooth shiny coating. You can do this by holding the jar from the inside to keep it steady, and spray painting the outside, although you may wait to wear gloves or just use something else to hold it so that your hands avoid being stained too.
If you’re making multiple jars, spray them all at the same time and let them dry completely before moving on to the next step.

Step 3
Once the jar is dry, add a layer of mod podge to the lower half of the jar. Even it out with the help of a brush. Then, making sure you have paper underneath to catch the excess, generously sprinkle the glitter over the area where the mod podge is applied, making sure all of the area is covered. Again, let it dry completely.


Step 4
Once the glitter is all set and dry, you will need to gently add an extra layer of craft glue to the glitter. This will help to seal it. And again, you guessed it, let it dry! Then add real or dried flowers to it, use within your centrepiece or to line your aisle. Then when you’re done with it you can use it as a desk tidy or make up brush holder too!

