
Easy tutorial for Table Plan Cards using your Cricut
If you're setting out your tables, you need a gorgeous table plan and there so many easy and unique ways to DIY it. Make your own out of wood and string (see our tutorial here), use crates, a step ladder, hang them off copper pipe, attach to gin bottles... the list is endless (search 'table plan ideas' on pinterest and you'll see what I mean!)

Here is a quick tutorial if you want to make your own DIY handwritten style cards for any kind of wedding seating plan:
WATCH HOW I DO IT HERE:
The below content contains affiliate links and we may earn a commission if you shop through them, however this won't cost you anything, it just helps us to keep the site running for free. For more information on affiliate links, see our disclosure here.
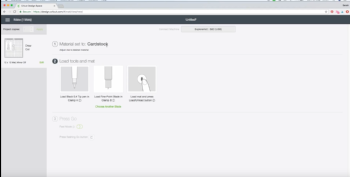
WHAT YOU WILL NEED:
Cardstock or thick paper
I use a Cricut Explore Air 2
Design software - I use Photoshop but if you don't have that, get a free trial from PicMonkey which is just as easy to use
A Cricut pen in the colour of your choice
STEP ONE:
Decide on the shape that you want your card to be. I have went with a simple luggage tag style shape as these table cards are going to be strung up on a suitcase.

Then also decide on the font that you want to use. I went with a thin script style font, and the thinner the better unless you want your cricut to do an outline of the words. Take a look at the list of fonts on design space and any that say they are for 'writing' should work really well. Once you have decided on the font, type your table header and the list of names out (even better if you can just copy and paste from an existing list!).

Now save the wording as an individual file, and the shape as a separate file.
STEP TWO:
Upload both files to design space. Re-size your shape to whatever size you want it, and then change the colour of it to white so you can see the writing on top.

Then re-size your text to fit over the shape, and position it where you want it to go. Change the text to write rather than cut, and choose which pen style you will be using.

STEP THREE:
Click make and set your material. I used cardstock but you may want to use a different setting if you are using a thinner material.
Now place your material on the cricut mat and make sure it is secure. Also push your pen into the pen holder on your cricut until it clicks into place, undoing the clasp first, and making sure you re-do it before loading your mat.

Once your mat has been loaded, press cut and watch the machine do it's magic!
You can obviously do more than one design at a time too and you can use different coloured cardstock, or play with different materials to make your place cards. You can also choose from countless different colours of pen dependant on your colour scheme.
STEP FOUR:
Once it is finished writing and cutting, unload your mat and flip it over, peeling the mat away from the card so that it doesn't bend (don't do what I did in the video!).

And then that's it - you have a gorgeous neat table plan card that everyone will be able to read and will think you have had made professionally.
What kind of seating plan are you making? Drop a comment below to let me know!