
How To Make Your Own Wooden Wedding seating plan
This large rustic seating plan is the perfect choice if you want something that is easy to make, cheap and adjustable right up until the day of your wedding. This is especially handy if you think there might be some last minute musical chair style changes.
The below content contains affiliate links and we may earn a commission if you shop through them, however this won't cost you anything, it just helps us to keep the site running for free. For more information on affiliate links, see our disclosure here.
You will need:
A large piece of timber/plywood, stained or painted if preferred (I stained mine with rich oak)

I used a tall piece that I could stand up against something, but you can also use an easel to display it if you want to do a smaller piece of wood.
A stencil. Make your own with a Cricut machine, Silhouette or a craft knife and vinyl, or buy one from a seller on Etsy. I used Ritrama Permanent Vinyl
Some transfer paper
Some paint and a paintbrush/sponge (I used opaque white paint)
Some twine or craft string
6 or more small hooks (usually found in picture hanging kits)

Some wooden clothes or craft pegs
Sheets of cardstock

The 'How to' part:
1. Sand your wood so it is nice and smooth, and paint or stain it if you want it to be a different colour.
2. Once the paint/stain is completely dry, you can start placing your stencil. Make sure your transfer paper is the same size as the stencil and place it over the top, smoothing out any bumps with a store card or similar.

3. Peel the back off the stencil, and stick it to the wood where you want your wording to be.
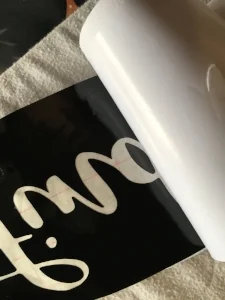

4. Again make sure it is free of any air bubbles before then peeling the transfer tape off as well. Once that is peeled off, again go over the stencil pushing down any air bubbles and making sure it is completely stuck on before painting.

4. Now you can paint your letters. Start with a really light coat of paint and build up each layer with an hour or two in between painting until you're happy with your coverage (I find I only really need to do two layers with opaque paint but it might take more, especially if your wood is dark) Be careful not to go over the edges of the stencil when you're painting as well.
5. Leave the paint to dry for another hour or so and then peel off the stencil very slowly and carefully, pulling around each letter as you go. NEVER EVER let the paint dry before taking the stencil off - I did that once and the stencil took half of the paint with it, what a mess!
(For more detailed instructions on how to paint a wood sign, take a look at my DIY Wooden Wedding sign tutorial)
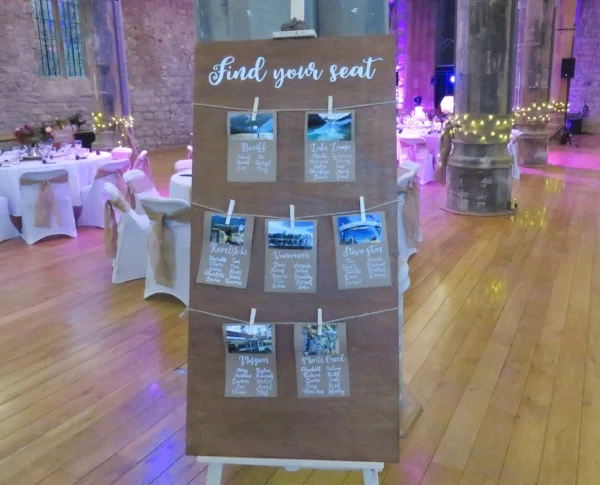
6. While the paint is drying you can be getting on with the rest of the sign. Measure out where you want your screws to go (make a mark with a pencil and some masking tape to be extra precise) Use a small screwdriver to start making a hole and then start twisting in the hooks by hand until they are secure.

7. Measure out your lengths of twine/string and tie to the hook on either side - you want it to be tied fairly tight as once you peg your cards on there it will pull it down a bit anyway.

8. Plan your tables and make a card for each one with everyone's name on (check out our tutorial for how to do this on a cricut here). They can be themed, or just numbered, it's up to you. Make sure to measure them out so they will all fit on your sign, and once they're done peg them on using craft or clothes pegs. I hand-lettered all of my table cards, but you could just print them and stick on to backing card stock if you prefer.
Because our main wedding was in Canada we made each card a different place we had visited and added a photo to each one too to make it a bit more interesting, however, you can go as simple as you like.
And if you want to make your own vinyl stencils for unlimited signs and decorations, then get yourself a Cricut machine or a Silhouette Cameo! There are 1000 different things you can do with them, and they will help you make Christmas gifts, Birthday gifts, party decorations and plenty of other crafty things for years to come. Take a look at the Cricut website for more info.
I'd love to hear how you got on making your own wedding seating plan sign, drop me a comment below.