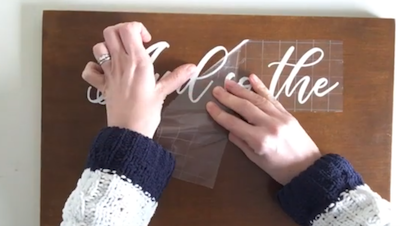
How To Apply Wedding Vinyl Decals
Applying vinyl decals is super easy, watch our step by step tutorial below…
The below content contains affiliate links and we may earn a commission if you shop through them, however this won't cost you anything, it just helps us to keep the site running for free. For more information on affiliate links, see our disclosure here.
And for a bit more info and more detailed instructions on how to apply a vinyl decal, check out the written guide below...
What you need:
A Vinyl Decal - make your own with a Cricut, Silhouette or find a Decal seller on Etsy - I used Ritrama Permanent Vinyl
Transfer tape/paper (Comes in rolls on Amazon but most sellers include it with all of their designs)
Something to stick it on (wood, mirror, perspex, a smooth wall...)
A vinyl scraper or credit card
A weeding tool or pin
Step one:
If it hasn't already been done, get rid of the bits of vinyl that surround the lettering and don't forget the bits inside of the letters too. You should be left with just the wording once that's done.
Step two:
Take your transfer tape and lay it over the top of your wording, trying to get it as straight as possible. If your design is quite large, it may be easier to cut the decal and the transfer paper into smaller sections and then place the transfer paper over each bit instead.
Then use a vinyl scraper (I use a cricut one) or a plastic store/credit card to smooth down the transfer tape to get rid of any bumps or air bubbles
Step three:
Once you're happy that your transfer tape is fully secure, flip it over and rub the back of the transfer tape too. Then peel the paper back away from the decal, making sure you don't take any of the letters with you. Do it really slowly so that if you do see any letters peeling back with the paper, you can stick them back to the transfer tape.
Step four:
Now all you need to do is place your design on your chosen surface. You can choose a mirror, perspex, wood, thick card... as long as the surface is flat, smooth, clean and dry then the vinyl decal should stick to just about anything (within reason)!
If you want to make sure it is straight, use a laser level and/or measure out where you want to put it, using masking tape so you remember where to place it.
Step five:
Use your store card/applicator again to smooth down the letters, this time making sure the vinyl is stuck to your surface with no bumps or air bubbles. If you do get an air bubble, try and push it towards the outside of your letters to get rid of it.
Once you're happy with it and all of the letters are fully stuck to your surface, you can then peel off your transfer tape...
Go really slow and if you see any of the letters peeling with the transfer tape stick them back down to the surface! Don't miss any extra bits like the dot of an i, or the commas.
Repeat for each section of your lettering.
If you have any issues with applying check out our vinyl troubleshooting post here: https://thediybridesboutique.com/diy-signs/myvinyldecalwontstick
And it's as easy as that!
Make a welcome sign, a seating chart, a love quote that you can keep forever or use vinyl decals to make gifts like hangers, or wedding favor glasses. The list really is endless.
And if you want to make your own vinyl decals for unlimited signs and decorations, then get yourself a Cricut machine or a Silhouette Cameo! There are 1000 different things you can do with them, and they will help you make Christmas gifts, Birthday gifts, party decorations and plenty of other crafty things for years to come. Take a look at the Cricut website for more info.


